Code components
Connxio uses C# code components to transform data at multiple points in the pipeline. This page explains how to create, upload, and use them. For splitting and batching variants, see splitting and batching.
What is a code component?
A code component is C# code compiled into a DLL. Connxio runs it in a sandbox, provides message content and metadata, and uses the returned output in the next pipeline step.
Creating a component
Create a new console project or class library in Visual Studio, or use the .NET CLI:
dotnet new console -n MyCodeComponent
#OR
dotnet new classlib -n MyCodeComponent
We recommend .NET 10.0, but older versions may work as well.
Install the Connxio.Transformation package in your C# project:
dotnet add package Connxio.Transformation --version 0.2.2
Or add to the .csproj file directly:
<PackageReference Include="Connxio.Transformation" Version="0.2.2" />
If you still use Communicate.ConnXio.Transformation, migrate to Connxio.Transformation.
After project setup and package install, create a file and paste this code:
using Newtonsoft.Json;
using Connxio.NuGet.Public.Transformation.Interfaces;
using Connxio.NuGet.Public.Transformation.Models;

public class MyFirstConnioMap : IConnxioMap
{
    /// <summary>
    /// The method called from the engine when a mapping is executed.
    /// </summary>
    /// <param name="transformationContext">The object containing the message content as it is currently and metadata relevant for the current context</param>
    /// <returns>An instance of TransformationContext. You can return the same instance as the one received in as input parameter, after making some chacges as in the example, or create a brand new one</returns>
    public TransformationContext Map(TransformationContext transformationContext)
    {
        //Add error handling as necessary, this will give better error messages in the logs
        if (transformationContext.Content == null)
            throw new ArgumentException("Content field is null");

        //You can use newtonsoft and other basic nuget packages. Contact the Connxio team if you need a non supported package.
        dynamic obj = JsonConvert.DeserializeObject(transformationContext.Content) ?? throw new ArgumentException("Content is not a valid JSON");
        obj.Prop = "Done";

        //Add data to user properties if needed
        transformationContext.MetaData.UserDefinedProperties.Add("INeedThisLater", (string)obj.Prop);

        //Use collected data as needed
        obj.Prop2 = transformationContext.MetaData.DataCollection.GetValueOrDefault("MyCollectedData", "No data collected");

        //Replace the original content with a string representation of the object "obj"
        transformationContext.Content = JsonConvert.SerializeObject(obj);

        //Return the updated transformationContext
        return transformationContext;
    }
}
The test project below uses NUnit. Install these test packages:
<PackageReference Include="Microsoft.NET.Test.Sdk" Version="17.3.1" />
<PackageReference Include="NUnit" Version="3.13.3" />
<PackageReference Include="NUnit3TestAdapter" Version="4.2.1" />`
The code above shows core code component capabilities and can be used as a boilerplate for most transformations. Run the Map method with sample input in Program.cs or in a unit test. Example unit test:
public class CodeComponentTest
{
    public MyFirstConnxioMap Mapper { get; set; }

    [SetUp]
    public void Setup()
    {
        Mapper = new MyFirstConnxioMap();
    }

    [Test]
    public void Test_Map_Invoice()
    {
        string testDataColContentAsString = GetTestDataColContentString();
        string testContentAsString = GetTestContentString();

        Dictionary<string, string> dataCol = new Dictionary<string, string>();
        dataCol.Add("invoice", testDataColContentAsString);

        ContextMetaData contextMetaData = new ContextMetaData
        {
            DataCollection = dataCol
        };

        TransformationContext transformationContext = new TransformationContext
        {
            Content = testContentAsString,
            MetaData = contextMetaData
        };

        var mappedContent = Mapper.Map(transformationContext);
    }

    private string GetTestDataColContentString()
    => File.ReadAllText(@"TestFiles/Invoice/Test_Invoice_Multiline.txt");

    private string GetTestContentString()
    => File.ReadAllText(@"TestFiles/Invoice/Partitioned_Id.txt");
}
After writing and testing your component, build the project to generate the DLL. Typical output path: ...\MyProject\bin\Debug\net10.0\bin\MyProject.dll.
Zipped Code Components
Standard code components support system packages and a limited set of additional NuGet packages. For custom or unsupported dependencies, use Zip Components, which run in their own environment.
Use the standard component type unless you specifically need unsupported NuGet dependencies. It is faster and easier to manage.
Requirements
Step 1
Create a standard code component first by following Creating a component.
Step 2
Edit the component .csproj and change the Connxio.Transformation reference to:
<PackageReference Include="Connxio.Transformation" Version="0.1.6">
  <ExcludeAssets>runtime</ExcludeAssets>
</PackageReference>
<ExcludeAssets>runtime</ExcludeAssets> prevents runtime version collisions with the host function in Connxio.
Currently, this is required for:
- Newtonsoft.Json
Step 3
In the same .csproj, add <EnableDynamicLoading>true</EnableDynamicLoading> in <PropertyGroup>:
<PropertyGroup>
  <TargetFramework>net10.0</TargetFramework>
  <ImplicitUsings>enable</ImplicitUsings>
  <Nullable>enable</Nullable>
  <EnableDynamicLoading>true</EnableDynamicLoading>
</PropertyGroup>
Example .csproj:
<Project Sdk="Microsoft.NET.Sdk">

	<PropertyGroup>
		<TargetFramework>net10.0</TargetFramework>
		<ImplicitUsings>enable</ImplicitUsings>
		<Nullable>enable</Nullable>
		<EnableDynamicLoading>true</EnableDynamicLoading>
	</PropertyGroup>

	<ItemGroup>
		<PackageReference Include="Connxio.Transformation" Version="0.1.6">
			<ExcludeAssets>runtime</ExcludeAssets>
		</PackageReference>
	</ItemGroup>

</Project>
Step 4
Add the NuGet packages and code you need. Code Components do not support external calls.
Step 5
Build the project and zip the result. Compress the contents of the output folder (usually "../MyCodeComponentSolution\MyCodeComponentProject\bin\Debug\net10.0"), not the "net10.0" folder itself.
Note: Verify the archive by unzipping it. Files should extract directly into the destination folder.
Name the archive as needed, as long as it has the .zip extension.
Step 6
When the component is ready, upload it as described in Uploading your component. The upload dialog supports both .dll and .zip and detects type from file extension.
Note: Other compressed filetypes like .rar or .7z are not supported at this time.
Step 7
Fill in DLL file name after selecting your file. It must point to the main DLL inside the zip, for example MyCodeComponent.dll.
Step 8
You are now ready to use the Zip Component.
Termination
You can terminate a message by throwing TransformationTerminatedException from your transformation code component. This also works for splitting and batching variants.
public class TransformationTerminatedException : Exception
{
    public ConnXioLogLevel LogLevel { get; set; }
    public ConnXioLogStatus Status { get; set; }
    public string? CustomStatus { get; set; }
    public int? FailureReturnStatusCode { get; set; } = 400;
}

public enum ConnXioLogStatus
{
    Error,
    Success,
    Warning,
    Terminated
}
public enum ConnXioLogLevel
{
    None,
    Minimum,
    Standard,
    Verbose,
    Never
}
Exception properties:
- LogLevel: This is the Connxio loglevel described in the logging documentation.
- Status: This is the logging status described in the logging documentation.
- CustomStatus: A custom description for the termination or failure.
- FailureReturnStatusCode: Return failure code. Only used on API inbound synchronous transform result mapping.
Using FailureReturnStatusCode
Example using FailureReturnStatusCode:
public class MyCodeMap : IConnxioMap
{
    public TransformationContext Map(TransformationContext transformationContext)
    {

        if (transformationContext.Content == null)
            throw new ArgumentException("Content field is null");

        // Each subintegration will have a FinalSynchronousMessageResponse
        IEnumerable<FinalSynchronousMessageResponse> subintResponses = JsonConvert.DeserializeObject<IEnumerable<FinalSynchronousMessageResponse>>(transformationContext.Content);

        // Just get the first one in this example. Production code should handle multiples.
        int statuscode = subintResponses.First().SynchronousMessageResponses.First().MetaData.OutboundRestResponse.StatusCode;

        //Create method to screen for failure codes
        if (isFailureCode(statuscode))
            throw new TransformationTerminatedException("Operation failed", failureReturnStatusCode: statuscode);

        // The data in transformationContext.Content will be your new API response.
        transformationContext.Content = "Operation success";

        return transformationContext;
    }
}
In API inbound synchronous response mapping, this enables graceful failure return codes.
Default status is 400 for failures and 200 for success. Overriding success codes is not supported.
Termination (deprecated)
This termination method is deprecated and provides less functionality than TransformationTerminatedException. Use the newer method above.
You can terminate a message by throwing NotImplementedException from your transformation code component. This does not work for splitting and batching variants.
You can include a code word in the exception message to control logging behavior. The pipeline is always terminated; the code word controls status and log level.
//The code word before the pipe (|) is used to select the action while the text after the pipe is used as the log event message sent via the [logging events functionality](/integrations/logging).
throw new NotImplementedException("Warning|Pipeline terminated with warning");
We support the following options on termination:
| Code word | Action |
|---|---|
| Success | The termination is logged as success with minimum log level. |
| Warning | The termination is logged as a warning with the minimum log level. |
| Error | The termination is logged as an error with the none log level. |
| Loglevel:None | The termination is logged with the terminated status but with the none log level instead of the default minimum level. |
| Loglevel:Never | The termination is not logged at all. |
| Default behavior | The termination is logged with the terminated status on the minimum log level with the message: "Transaction terminated by code map" |
Configuring Code components
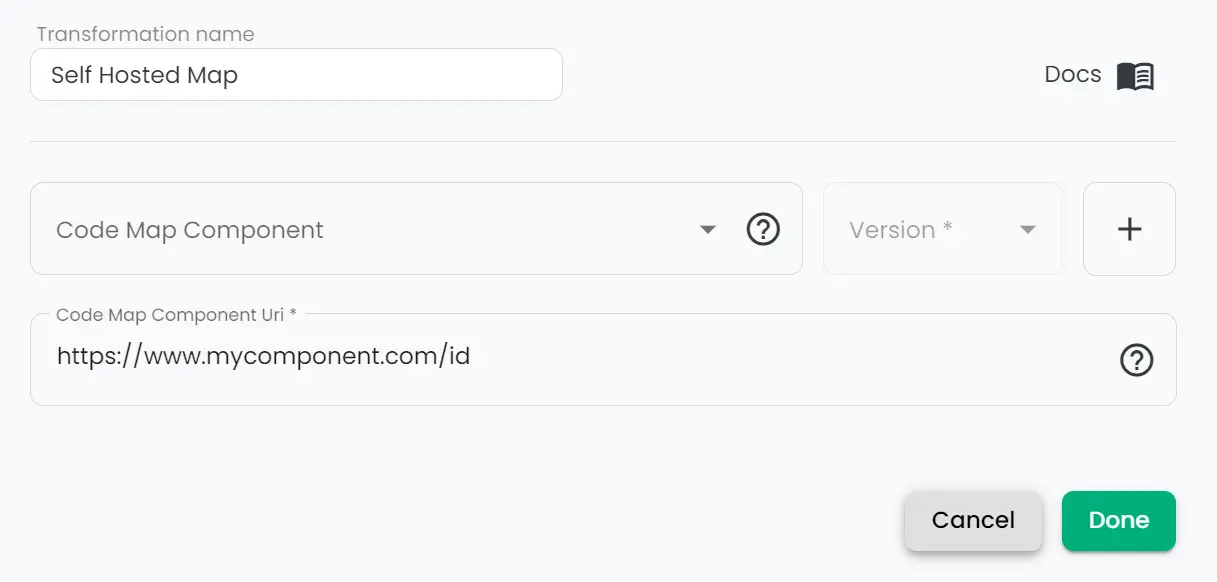
To configure code components, select Code transformation in the "Transformations" list.
When you create a new transformation, a popup appears with the transformation input fields.
Uploading your component
Connxio supports both internal and external component upload. For external upload, the raw DLL must be available through an HTTP GET endpoint in your integration configuration.
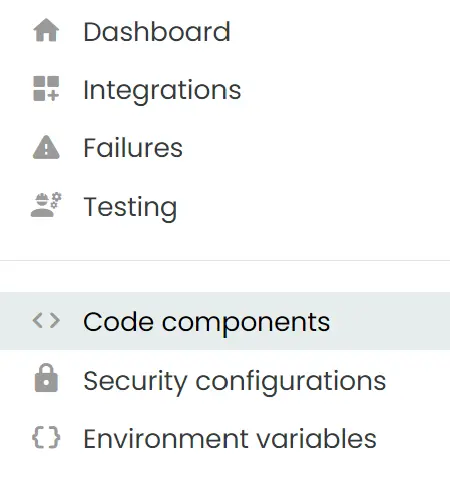
For internal upload, use the Code Components page. Open it from the + button in code mapping, or from the left-side menu. From there, you can create or edit components.
When creating a new code component, fill in these fields:
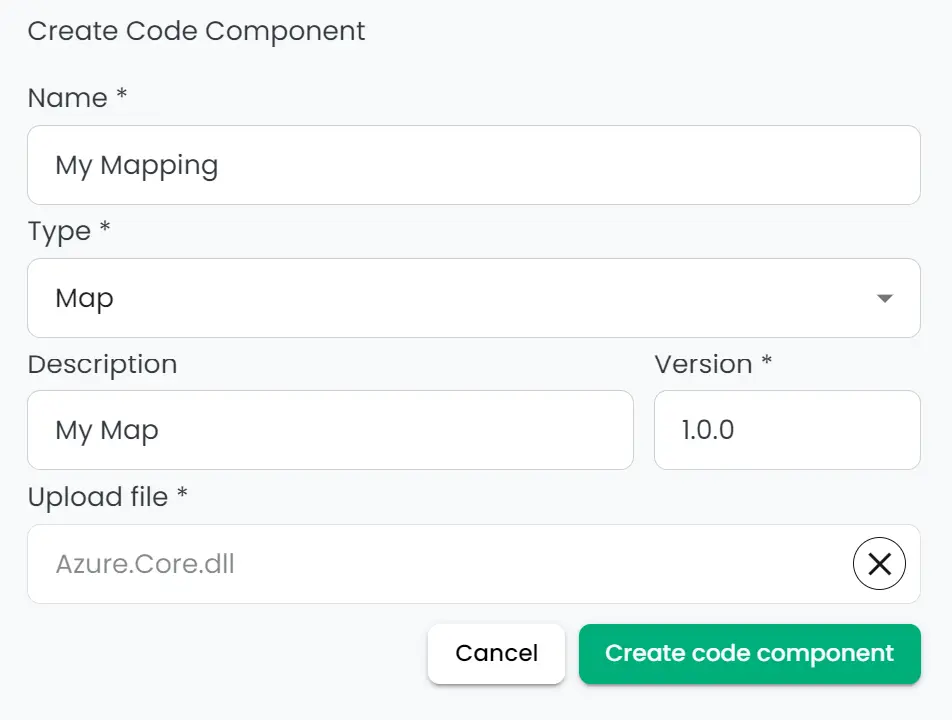
Name: The name of the map that you can reference in the component list.
Type: The type of map. Read more about types [here].
Description: A description of your map.
Version: The version of the map. You can deprecate and manage maps by version in the component view.
Using the component
With internal upload, select your code map component from the dropdown list:
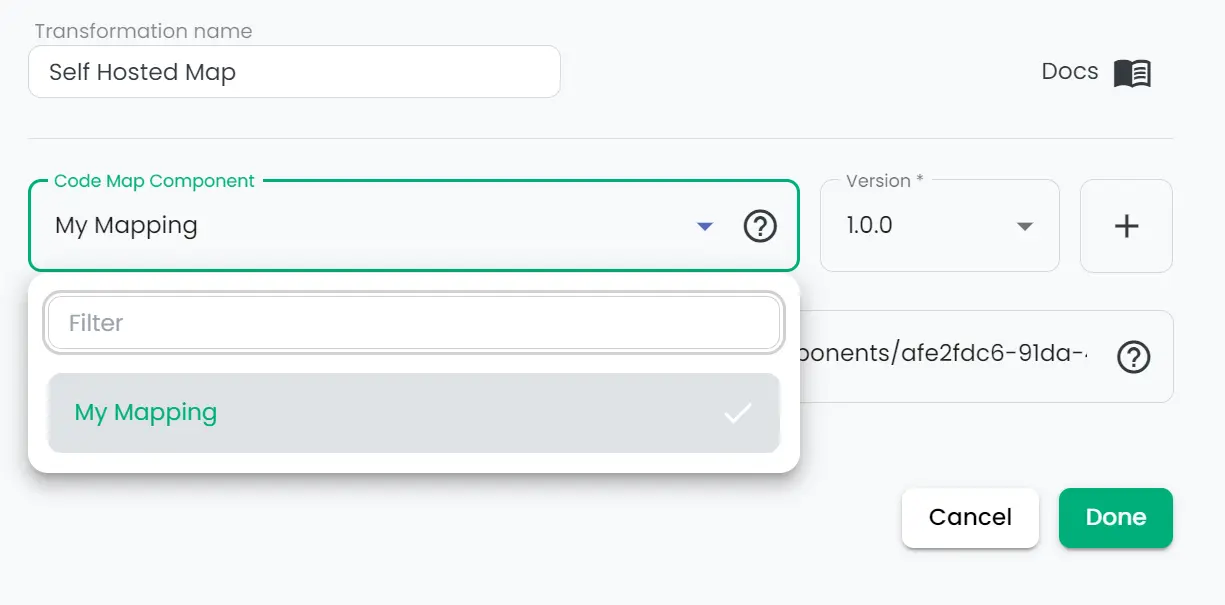

With external upload, paste your URI in Code Map Component Uri.
Caching
Components are cached for 30 seconds after loading. Keep this in mind when testing rapid changes.